 class Convolution {

  // matrix to sharpen image
  int[][] matrix = { { 0, -1, 0 }, { -1, 5, -1 }, { 0, -1, 0 } };
  ...
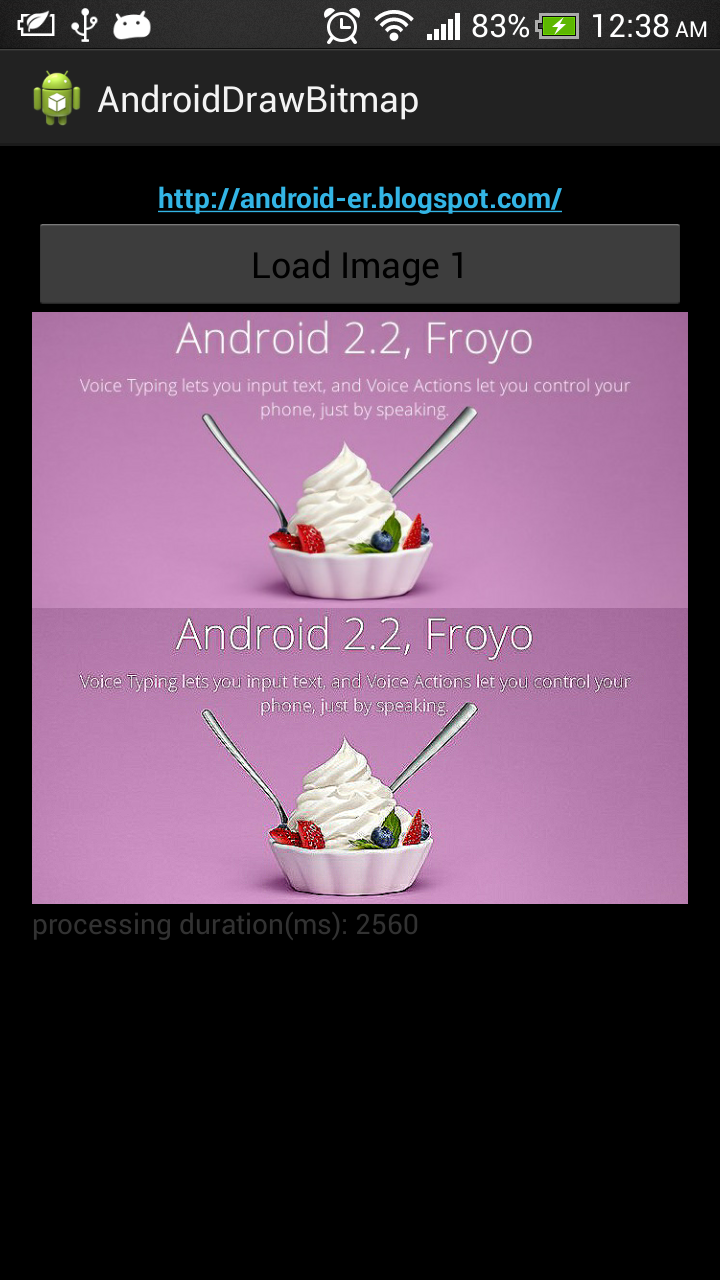
more: Something about processing images in Android
class Convolution {
// matrix to sharpen image
int[][] matrix = { { 0, -1, 0 }, { -1, 5, -1 }, { 0, -1, 0 } };
...


package com.example.androiddrawbitmap;

import java.io.FileNotFoundException;

import android.net.Uri;
import android.os.Bundle;
import android.app.Activity;
import android.content.Intent;
import android.graphics.Bitmap;
import android.graphics.BitmapFactory;
import android.graphics.Canvas;
import android.graphics.Color;
import android.view.View;
import android.view.View.OnClickListener;
import android.widget.Button;
import android.widget.ImageView;
import android.widget.TextView;

public class MainActivity extends Activity {

 Button btnLoadImage;
 ImageView imageResult, imageOriginal;
 TextView textDur;

 final int RQS_IMAGE1 = 1;

 Uri source;
 Bitmap bitmapMaster;
 Canvas canvasMaster;

 @Override
 protected void onCreate(Bundle savedInstanceState) {
  super.onCreate(savedInstanceState);
  setContentView(R.layout.activity_main);

  btnLoadImage = (Button) findViewById(R.id.loadimage);
  imageResult = (ImageView) findViewById(R.id.result);
  imageOriginal = (ImageView) findViewById(R.id.original);
  textDur = (TextView) findViewById(R.id.dur);

  btnLoadImage.setOnClickListener(new OnClickListener() {

   @Override
   public void onClick(View arg0) {
    Intent intent = new Intent(
      Intent.ACTION_PICK,
      android.provider.MediaStore.Images.Media.EXTERNAL_CONTENT_URI);
    startActivityForResult(intent, RQS_IMAGE1);
   }
  });
 }

 @Override
 protected void onActivityResult(int requestCode, int resultCode, Intent data) {
  super.onActivityResult(requestCode, resultCode, data);

  if (resultCode == RESULT_OK) {
   switch (requestCode) {
   case RQS_IMAGE1:
    source = data.getData();

    try {
     bitmapMaster = BitmapFactory
       .decodeStream(getContentResolver().openInputStream(
         source));

     imageOriginal.setImageBitmap(bitmapMaster);
     loadBlurBitmap(bitmapMaster);

    } catch (FileNotFoundException e) {
     e.printStackTrace();
    }

    break;
   }
  }
 }

 private void loadBlurBitmap(Bitmap src) {
  if (src != null) {

   Bitmap bmBlur;
   Convolution convolution = new Convolution();

   long startTime = System.currentTimeMillis();
   bmBlur = convolution.convBitmap(src);
   long duration = System.currentTimeMillis() - startTime;

   imageResult.setImageBitmap(bmBlur);
   textDur.setText("processing duration(ms): " + duration);
  }
 }

 class Convolution {

  // matrix to blur image
  int[][] matrix = { { 1, 1, 1 }, { 1, 1, 1 }, { 1, 1, 1 } };
  // kernal_width x kernal_height = dimension pf matrix
  // halfWidth = (kernal_width - 1)/2
  // halfHeight = (kernal_height - 1)/2
  int kernal_width = 3;
  int kernal_height = 3;
  int kernal_halfWidth = 1;
  int kernal_halfHeight = 1;

  public Bitmap convBitmap(Bitmap src) {

   int[][] sourceMatrix = new int[kernal_width][kernal_height];

   // averageWeight = total of matrix[][]. The result of each
   // pixel will be divided by averageWeight to get the average
   int averageWeight = 0;
   for (int i = 0; i < kernal_width; i++) {
    for (int j = 0; j < kernal_height; j++) {
     averageWeight += matrix[i][j];
    }
   }
   if (averageWeight == 0) {
    averageWeight = 1;
   }

   int pixelR, pixelG, pixelB, pixelA;

   int w = src.getWidth();
   int h = src.getHeight();
   Bitmap bm = Bitmap.createBitmap(w, h, Bitmap.Config.ARGB_8888);

   // fill sourceMatrix with surrounding pixel
   for (int x = 0; x < w; x++) {
    for (int y = 0; y < h; y++) {

     for (int xk = 0; xk < kernal_width; xk++) {
      for (int yk = 0; yk < kernal_height; yk++) {
       int px = x + xk - kernal_halfWidth;
       int py = y + yk - kernal_halfHeight;

       if (px < 0) {
        px = 0;
       } else if (px >= w) {
        px = w - 1;
       }

       if (py < 0) {
        py = 0;
       } else if (py >= h) {
        py = h - 1;
       }

       sourceMatrix[xk][yk] = src.getPixel(px, py);

      }
     }

     pixelR = pixelG = pixelB = pixelA = 0;

     for (int k = 0; k < kernal_width; k++) {
      for (int l = 0; l < kernal_height; l++) {

       pixelR += Color.red(sourceMatrix[k][l])
         * matrix[k][l];
       pixelG += Color.green(sourceMatrix[k][l])
         * matrix[k][l];
       pixelB += Color.blue(sourceMatrix[k][l])
         * matrix[k][l];
       pixelA += Color.alpha(sourceMatrix[k][l])
         * matrix[k][l];
      }
     }
     pixelR = pixelR / averageWeight;
     pixelG = pixelG / averageWeight;
     pixelB = pixelB / averageWeight;
     pixelA = pixelA / averageWeight;

     if (pixelR < 0) {
      pixelR = 0;
     } else if (pixelR > 255) {
      pixelR = 255;
     }

     if (pixelG < 0) {
      pixelG = 0;
     } else if (pixelG > 255) {
      pixelG = 255;
     }

     if (pixelB < 0) {
      pixelB = 0;
     } else if (pixelB > 255) {
      pixelB = 255;
     }

     if (pixelA < 0) {
      pixelA = 0;
     } else if (pixelA > 255) {
      pixelA = 255;
     }

     bm.setPixel(x, y,
       Color.argb(pixelA, pixelR, pixelG, pixelB));
    }
   }

   return bm;
  }
 }
}
 Download the files.Download and try the APK.


<?xml version="1.0" encoding="utf-8"?>
<manifest xmlns:android="http://schemas.android.com/apk/res/android"
    package="com.example.androidusbhost"
    android:versionCode="1"
    android:versionName="1.0" >

    <uses-feature android:name="android.hardware.usb.host" />
    <uses-sdk
        android:minSdkVersion="12"
        android:targetSdkVersion="18" />

    <application
        android:allowBackup="true"
        android:icon="@drawable/ic_launcher"
        android:label="@string/app_name"
        android:theme="@style/AppTheme" >
        <activity
            android:name="com.example.androidusbhost.MainActivity"
            android:label="@string/app_name" >
            <intent-filter>
                <action android:name="android.intent.action.MAIN" />

                <category android:name="android.intent.category.LAUNCHER" />
            </intent-filter>
        </activity>
    </application>

</manifest>
package com.example.androidusbhost;

import java.util.HashMap;
import java.util.Iterator;

import android.hardware.usb.UsbConstants;
import android.hardware.usb.UsbDevice;
import android.hardware.usb.UsbManager;
import android.os.Bundle;
import android.view.View;
import android.view.View.OnClickListener;
import android.widget.Button;
import android.widget.TextView;
import android.app.Activity;
import android.content.Context;

public class MainActivity extends Activity {

 Button btnCheck;
 TextView textInfo;

 @Override
 protected void onCreate(Bundle savedInstanceState) {
  super.onCreate(savedInstanceState);
  setContentView(R.layout.activity_main);
  btnCheck = (Button) findViewById(R.id.check);
  textInfo = (TextView) findViewById(R.id.info);
  btnCheck.setOnClickListener(new OnClickListener() {

   @Override
   public void onClick(View arg0) {
    checkInfo();
   }
  });
 }

 private void checkInfo() {
  UsbManager manager = (UsbManager) getSystemService(Context.USB_SERVICE);
  HashMap<String, UsbDevice> deviceList = manager.getDeviceList();
  Iterator<UsbDevice> deviceIterator = deviceList.values().iterator();

  String i = "";
  while (deviceIterator.hasNext()) {
   UsbDevice device = deviceIterator.next();
   i += "\n" +
    "DeviceID: " + device.getDeviceId() + "\n" +
    "DeviceName: " + device.getDeviceName() + "\n" +
    "DeviceClass: " + device.getDeviceClass() + " - "
     + translateDeviceClass(device.getDeviceClass()) + "\n" +
    "DeviceSubClass: " + device.getDeviceSubclass() + "\n" +
    "VendorID: " + device.getVendorId() + "\n" +
    "ProductID: " + device.getProductId() + "\n";
  }

  textInfo.setText(i);
 }

 private String translateDeviceClass(int deviceClass){
  switch(deviceClass){
  case UsbConstants.USB_CLASS_APP_SPEC:
   return "Application specific USB class";
  case UsbConstants.USB_CLASS_AUDIO:
   return "USB class for audio devices";
  case UsbConstants.USB_CLASS_CDC_DATA:
   return "USB class for CDC devices (communications device class)";
  case UsbConstants.USB_CLASS_COMM:
   return "USB class for communication devices";
  case UsbConstants.USB_CLASS_CONTENT_SEC:
   return "USB class for content security devices";
  case UsbConstants.USB_CLASS_CSCID:
   return "USB class for content smart card devices";
  case UsbConstants.USB_CLASS_HID:
   return "USB class for human interface devices (for example, mice and keyboards)";
  case UsbConstants.USB_CLASS_HUB:
   return "USB class for USB hubs";
  case UsbConstants.USB_CLASS_MASS_STORAGE:
   return "USB class for mass storage devices";
  case UsbConstants.USB_CLASS_MISC:
   return "USB class for wireless miscellaneous devices";
  case UsbConstants.USB_CLASS_PER_INTERFACE:
   return "USB class indicating that the class is determined on a per-interface basis";
  case UsbConstants.USB_CLASS_PHYSICA:
   return "USB class for physical devices";
  case UsbConstants.USB_CLASS_PRINTER:
   return "USB class for printers";
  case UsbConstants.USB_CLASS_STILL_IMAGE:
   return "USB class for still image devices (digital cameras)";
  case UsbConstants.USB_CLASS_VENDOR_SPEC:
   return "Vendor specific USB class";
  case UsbConstants.USB_CLASS_VIDEO:
   return "USB class for video devices";
  case UsbConstants.USB_CLASS_WIRELESS_CONTROLLER:
   return "USB class for wireless controller devices";
  default: return "Unknown USB class!";

  }
 }
}
<LinearLayout xmlns:android="http://schemas.android.com/apk/res/android"
    xmlns:tools="http://schemas.android.com/tools"
    android:layout_width="match_parent"
    android:layout_height="match_parent"
    android:paddingBottom="@dimen/activity_vertical_margin"
    android:paddingLeft="@dimen/activity_horizontal_margin"
    android:paddingRight="@dimen/activity_horizontal_margin"
    android:paddingTop="@dimen/activity_vertical_margin"
    android:orientation="vertical"
    tools:context=".MainActivity" >

    <TextView
        android:layout_width="wrap_content"
        android:layout_height="wrap_content"
        android:layout_gravity="center_horizontal"
        android:autoLink="web"
        android:text="http://android-er.blogspot.com/"
        android:textStyle="bold" />
    <Button
        android:id="@+id/check"
        android:layout_width="match_parent"
        android:layout_height="wrap_content"
        android:text="Check USB devices" />
    <TextView
        android:id="@+id/info"
        android:layout_width="match_parent"
        android:layout_height="wrap_content" />

</LinearLayout>
