How To Root Lenovo A7000.
Root Lenovo A7000. Today's guidebelajar will share to you about how to perform root on android smartphone device. Now I will explain how to root on Lenovo A7000. this device comes with Android OS, v5.0 (Lollipop) and suppoerted with Chipset Mediatek MT6752m, Processors Octa-core 1.5 GHz Cortex-A53, GPU Mali-T760MP2, 2 GB of RAM as their engine. Before we continued our experiment I will explain to you what is the meaning of root on android, additional feature is main camera with 8 MP and secondary camera 5 MP will give you good experience to take any picture.
By root your Lenovo A7000, you will allowing user to attain privileged control on this device. for example they can uninstall default applications in internal memory, or they can install Cutom ROM on Lenovo A7000. Beside some advantages, also there are some risk. For example, they will loose their warranty for this device.
Make sure to always take backup all your important data like music, video, SMS, document (see this guide) and other data to the other resource outside of Lenovo A7000 device, and make sure your battery is fully charged or at least there is 80% of power on it before you continoued to proceed.By root your Lenovo A7000, you will allowing user to attain privileged control on this device. for example they can uninstall default applications in internal memory, or they can install Cutom ROM on Lenovo A7000. Beside some advantages, also there are some risk. For example, they will loose their warranty for this device.
Guide Flash Lenovo A7000 using SP Flash Tool.
- Make sure your device is Lenovo A7000. because this guide is intended just for this device
- Then, Download this root tool for Lenovo A7000. Here
- Download this Recovery image.
- CWM Recovery Here
- TWRP recovery Here
- Next step is Enable developer options by go to Settings > About Phone > Device Info and tap on Build Number for about 7-8 times. or see this guide
http://guidebelajar.blogspot.com/2015/05/how-to-enable-usb-debugging-on-android.htmlor This Guide - Enable USB Debugging on your device.
- Goto > Settings > Developer Options > USB Debugging
- Enable unknown sources
- Go to Settings > Security and enable Unknown Sources option
- Now extract the Flash Tool archive downloaded before and click on flash_tool.exe.

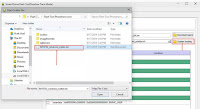
Root Lenovo A7000 - In the Scatter Loading field go to the folder where you extracted the Flash Tool and select MT6752_Android_scatter.txt.
https://drive.google.com/file/d/0B2I5z1mFfUpcZkNwSkN0TzVXd0E/view?usp=sharing
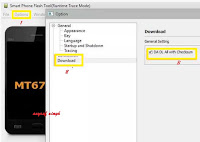
Root Lenovo A7000 - Then you click options ->Download -> then check DA DL all with checksum.

Root Lenovo A7000 - Next, close option box.
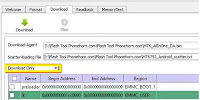
- On download tab, ensure you have selected download only option from dropdown menu, see below picture.

Root Lenovo A7000 - Then click on checkbox recovery and browse to the extracted files and locate recovery.img

Root Lenovo A7000 - Then, Turn off your Lenovo A7000 android phone.
- Pull you battery from Lenovo A7000
- Then, click download button on top right and connect your Lenovo A7000 with USB cable in phone switch off position.

Root Lenovo A7000 - Process will run automatic, and you can see the red stripe showing download percentage at bellow
- When your process complete, you can see a green circle with tick mark.

Root Lenovo A7000 - Now disconnect your Lenovo A7000
- Intall you battery again.
- Then, start your Lenovo A7000.
http://www.mediafire.com/download/8x0vzp726msw25z/Flash_Tool_Phonehorn.com.rarhttp://click.xda-developers.com/api/click?format=go&jsonp=vglnk_145091981470918&key=f0a7f91912ae2b52e0700f73990eb321&libId=iijhawq201000n4o000DAbf0p9yhj&loc=http%3A%2F%2Fforum.xda-developers.com%2Fchef-central%2Fandroid%2Frequest-cwm-twrp-recovery-lenovo-a7000a-t3102588&v=1&out=https%3A%2F%2Fdrive.google.com%2Ffile%2Fd%2F0BwpEpNLSDmlFcENFYm5Cai1ITGs%2Fview%3Fusp%3Dsharing&ref=https%3A%2F%2Fwww.google.com%2F&title=LENOVO%20A7000-a%20DEVELOPMENT&txt=%3Cfont%20size%3D%224%22%3EDownload%20here%3C%2Ffont%3Ehttp://click.xda-developers.com/api/click?format=go&jsonp=vglnk_145091983091019&key=f0a7f91912ae2b52e0700f73990eb321&libId=iijhawq201000n4o000DAbf0p9yhj&loc=http%3A%2F%2Fforum.xda-developers.com%2Fchef-central%2Fandroid%2Frequest-cwm-twrp-recovery-lenovo-a7000a-t3102588&v=1&out=https%3A%2F%2Fz5h64q92x9.net%2Fproxy_u%2Fru-en.en%2Fhttps%2Fyadi.sk%2Fd%2FI4xvv57Cgue4c&ref=https%3A%2F%2Fwww.google.com%2F&title=LENOVO%20A7000-a%20DEVELOPMENT&txt=%3Cfont%20size%3D%224%22%3EDownload%20here%3C%2Ffont%3Ehttp://guidebelajar.blogspot.com/2015/03/tips-n-trik-cara-masuk-usb-debugging-lg.htmlRoot Lenovo Lenovo A7000.
To perform root on Lenovo Lenovo A7000, you must have CWM recovery installed on Android system. then you must download UPDATE-SuperSU-v2.46.zip (here).
https://userscloud.com/o8m7u398nmv5When it's done, now follow this guide to root your device.- First, copy the UPDATE-SuperSU-v2.46.zip file in your SD card root folder
- Then, Enter/Reboot to recovery mode on your Lenovo A7000 device. How to do this :
- Switch off your phone
- Then, Press and hold the Volume Down Button + Volume Up Button + Power Button.
- When you see the Boot Screen, Release the Power Button only.
- keep the Volume Buttons pressed until you see the Recovery Screen.
- Then, Select the UPDATE-SuperSU-v2.46.zip file and click update to root Lenovo A7000.
- Wait the process untill finish.
- Now, You can confirm your device is rooted or not by downloading the Root Checker app from Google Playstore.
https://play.google.com/store/apps/details?id=com.jrummyapps.rootchecker - Finish.